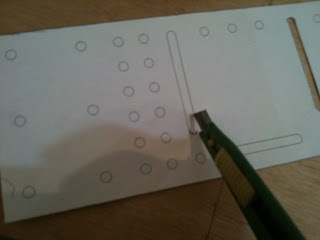
Continuing from the previous post, the reason i chose this method was the lack of money and the tools i already had on my garage. I assume you have downloaded Inkscape and the .svg files, so I'll start...
Step 1: Printing the .svg files (Inkscape tutorial)
In order to print the parts you must first select the area which you will print so press File->Document Properties(or Ctrl+Shift+D) and then select in the Page tab, in the Format field the option A4. Also select the desired measurement system you do want in the up right corner (General). Now you can see the area which will be printed. Just move the file and place the parts you want inside the area.
You can see the parts in 1:1 scale by selecting View-> Zoom-> Zoom 1:1.
The axis top and left are in the measurement system you picked before. Click on them and drag the mouse in the drawings so that the lines will appear.
On the bottom of the window you can see the coordinates of the line while you have it selected. On the top toolbox you can see the coordinates of selected object.
Now you just print all the parts in paper, and start cutting with a scissors or a razor. You have to cut only one blueprint from every part.
Notice: You can remove the paper from the inner holes with a razor at this moment and transfer it to wood or you can first cut the outline of the parts and then finish them.
Take care that you have to be very careful with the distances from hole to hole etc, rather than the exact shape of the part for the majority of them.
Step 1: Printing the .svg files (Inkscape tutorial)
In order to print the parts you must first select the area which you will print so press File->Document Properties(or Ctrl+Shift+D) and then select in the Page tab, in the Format field the option A4. Also select the desired measurement system you do want in the up right corner (General). Now you can see the area which will be printed. Just move the file and place the parts you want inside the area.
You can see the parts in 1:1 scale by selecting View-> Zoom-> Zoom 1:1.
The axis top and left are in the measurement system you picked before. Click on them and drag the mouse in the drawings so that the lines will appear.
On the bottom of the window you can see the coordinates of the line while you have it selected. On the top toolbox you can see the coordinates of selected object.
 |
| Selecting the size (3) |
 |
| Moving the print area (4) |
Now you just print all the parts in paper, and start cutting with a scissors or a razor. You have to cut only one blueprint from every part.
 |
| cutting the inner shapes (5) |
Notice: You can remove the paper from the inner holes with a razor at this moment and transfer it to wood or you can first cut the outline of the parts and then finish them.
Take care that you have to be very careful with the distances from hole to hole etc, rather than the exact shape of the part for the majority of them.


No comments:
Post a Comment